


The quick, and let’s say, easy way to send emails from your Android application is to use Intent. However, it can take you only so far due to the method’s limitations.
This article explores Android JavaMail API as a more flexible and scalable method to send emails.
First, I’ll detail the reasons to opt for JavaMail API instead of Intent, then I’ll jump into the implementation tutorials with code examples.
When and why should you send emails without Android Intent?
Simply, it’s all about having more flexibility, reliability, and control in various applications and scenarios. But here’s a more granular overview of why to consider JavaMail integration to send an email from an Android app.
- Server-side control: Using server-side technologies (like SMTP) to send emails gives you more control over the email-sending process. This method is more reliable for automated emails, such as notifications or system-generated messages, where you need confirmation that the email was sent successfully.
- Customization and formatting: Compared to what you can get natively from Android Studio and ‘intent.action_send’, server-side email sending allows for more complex HTML formatting and customization. Proper sending solutions like Mailtrap Email Sending can offer more robust formatting options.
- Avoiding user interaction: Under specific circumstances, you may want to send emails in the background without user intervention or without a dialog box to notify the user. However, Android Intent requires the user to manually complete the email-sending process in an email client. In contrast, server-side sending can happen automatically without user interference.
- Bulk or scheduled emails: This isn’t feasible with Android Intent, but server-side solutions can handle bulk emailing and scheduling.
- Security and privacy: Simply, server-side solutions can provide better security measures (e.g. encryption). It helps avoid exposing sensitive content or docs to third-party email clients on the user’s device.
- Avoiding email client dependency: You’d want to ensure the email functionality is not dependent on the presence of an email client on the user’s device. Some users might not have a default email client set up, which is a requirement for Android Intent-based email sending.
- Compliance and logging: Server-side emailing can offer detailed logs and comply with specific regulations, which is crucial for certain types of applications, especially in business or healthcare sectors.
Keynotes before we continue:
- This tutorial doesn’t tell you how to import Android dependencies within the studio. If you need to set New Intent in the XML file, check this article. It covers the Intent method in full.
- Ideally, you should test the flows on an Android device, be it an Android phone or tablet. If you use emulators you need to make sure that the Email app has been set up. Better yet, you’d also configure Gmail (Gmail app) and Microsoft Outlook to have a clear preview over different clients.
- This tutorial covers only email, not the SMS sending functionality.
- Pro tip – don’t use Gmail SMTP to send emails from Android. There are quite stringent throughput limitations and may require additional programming.
Android send email through JavaMail
JavaMail API provides a platform and protocol-independent framework to build mail and messaging applications.
To no surprise, JavaMail API requires careful handling of background operations to ensure top-level security. I’ll guide you through setup and implementation and I’ll be dedicating special attention to the security measures.
Note: There’s also an option to set up Android email sending using Kotlin, but this tutorial exclusively uses Java.
Setup
- Step – Adding dependencies
Add the following dependencies to the build.gradle file.
implementation 'com.sun.mail:jakarta.mail:2.0.1'
implementation 'com.sun.activation:jakarta.activation:2.0.1'
- Step – Adding internet permission
JavaMail requires internet access so you need to add the associated permission to AndroidManifest.xml.
<uses-permission android:name="android.permission.INTERNET"/>
Implementation
The sections further down the article cover detailed implementation (SMTP and API). But here’s a quick overview so you understand the scope.
- Email session configuration: You need to create a method to configure the email session. For example, this involves setting properties like the mail protocol (SMTP), host, port, and authentication details.
- Composing the message: Use
MimeMessageto compose an email. Within that header, you’ll be setting the sender’s email, recipient’s email, subject, and email body.
- Sending the message: Finally, you establish the connection with the email server using the
Transport.send()command, and then send the message.
Also, you’ll need to choose a proper sending service like Mailtrap Email Delivery Platform, which will be featured in this article.
Important Note:
Email sending via JavaMail API should be an asynchronous operation within a background thread. When sending emails from a background thread, you avoid blocking the UI thread.
Send email in Android with JavaMail and external SMTP
In this quick tutorial, I assume you’ve added the necessary dependencies and the internet permission. The tutorial is also geared towards Mailtrap users.
Step 1 – Configure Mailtrap SMTP
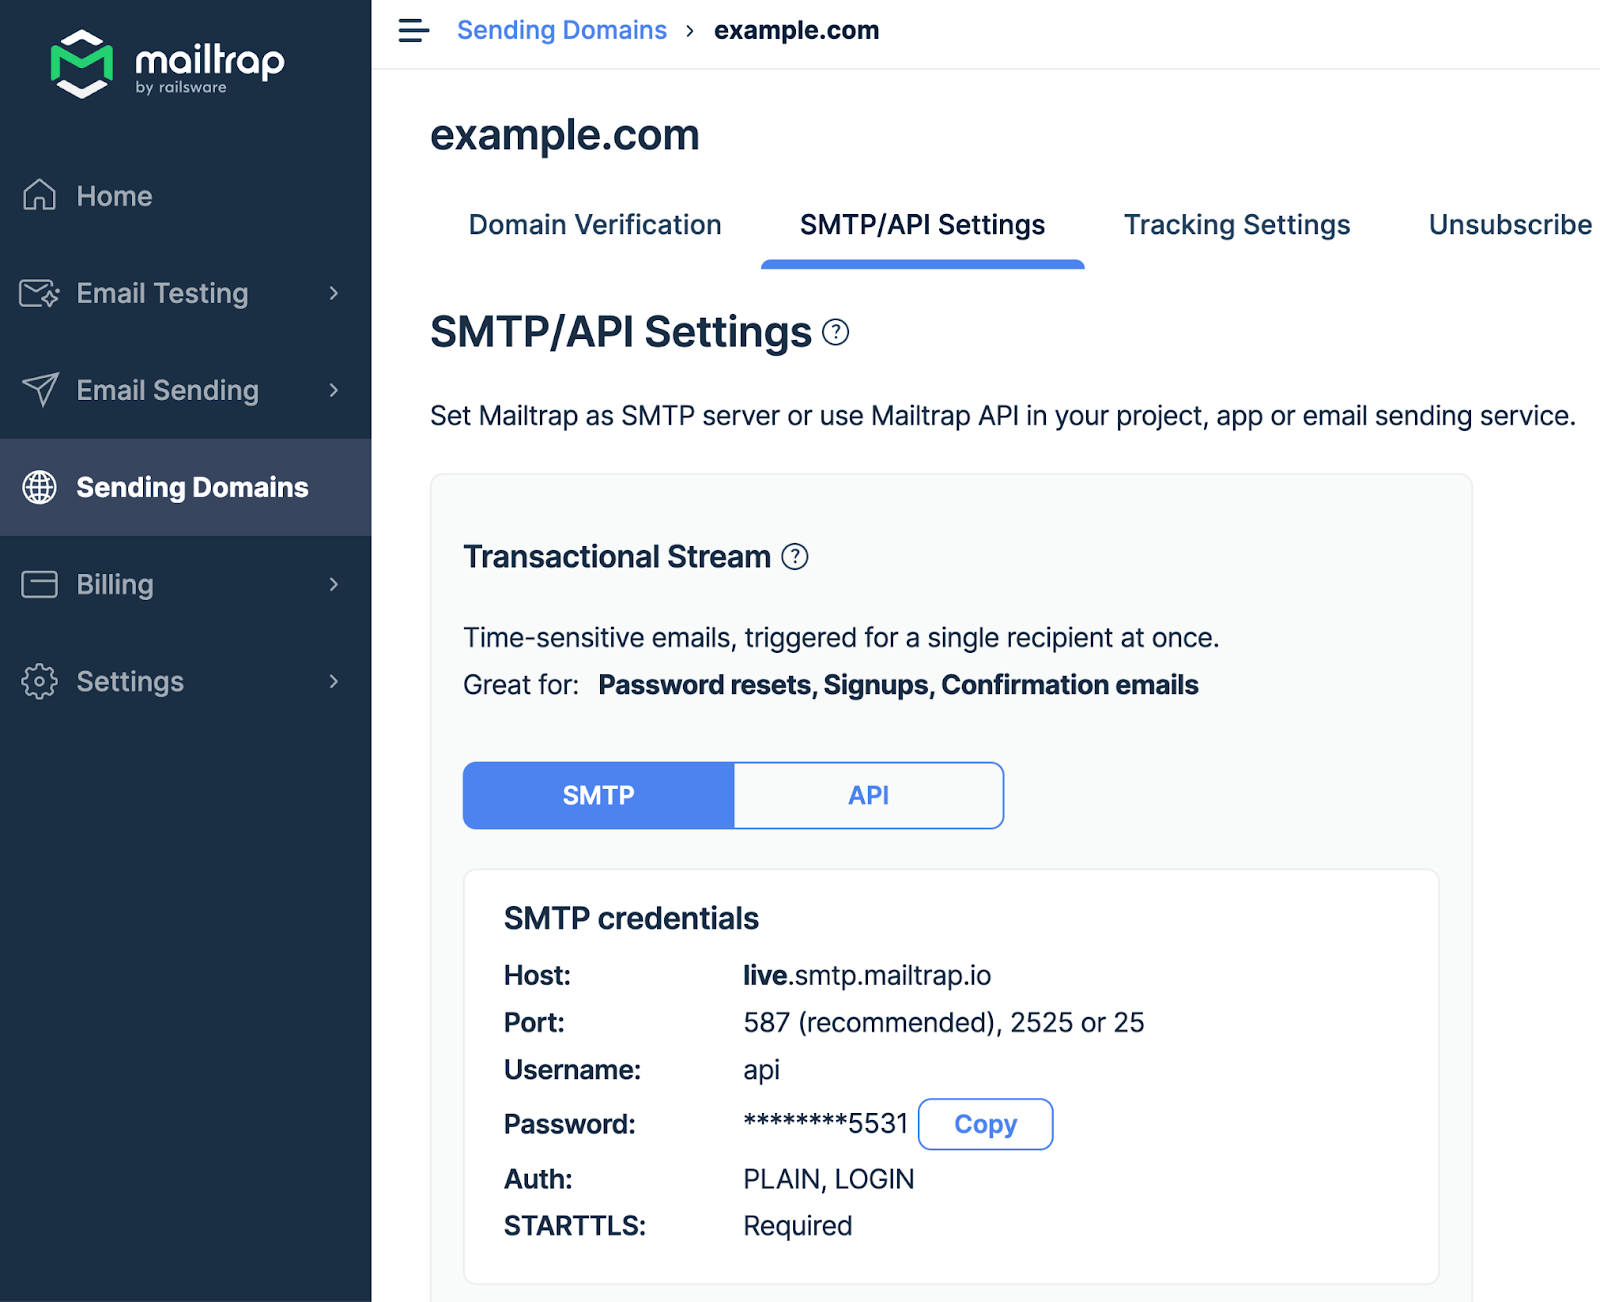
You can find the SMTP credentials under the “SMTP Settings” section. Within Mailtrap, this is the second step of the Sending Domains setup process.
Keep in mind that you need to verify and authenticate your domain to be able to send emails. During the verification process, you’ll be asked to add DNS records to your domain provider’s DNS.
Learn more about DNS records and their importance in our Email deliverability cheatsheet playlist ⬇️.
That out of the way, here are the exemplary credentials
Host: live.smtp.mailtrap.io*
Port: 587 (recommended)
Username: api**
Password: Mailtrap password specific to your account
Notes:
- *live.smtp.mailtrap.io is the endpoint for sending transactional emails. If you want to send bulk (marketing) emails, the endpoint is bulk.smtp.mailtrap.io. But first, make sure to accept the terms of service to unlock the Bulk Stream.
- **api is the universal username for all Mailtrap Email Sending users.
Step 2 – Create an email sender class
import jakarta.mail.Authenticator
import jakarta.mail.BodyPart
import jakarta.mail.Message
import jakarta.mail.MessagingException
import jakarta.mail.Session
import jakarta.mail.Transport
import jakarta.mail.internet.InternetAddress
import jakarta.mail.internet.MimeBodyPart
import jakarta.mail.internet.MimeMessage
import jakarta.mail.internet.MimeMultipart

val props = System.getProperties()
props["mail.smtp.host"] = ‘sandbox.smtp.mailtrap.io’
                props["mail.smtp.socketFactory.port"] = ‘587’
                props["mail.smtp.socketFactory.class"] = "javax.net.ssl.SSLSocketFactory"
                props["mail.smtp.auth"] = true
                props["mail.smtp.port"] = ‘587’
                props["mail.smtp.starttls.enable"] = true
val session = Session.getInstance(props,
                    object : Authenticator() {
                        //Authenticating the password
                        override fun getPasswordAuthentication(): jakarta.mail.PasswordAuthentication {
                            return jakarta.mail.PasswordAuthentication(smtpUsername, smtpPassword)
                        }
                    })
 // Create a default MimeMessage object.
                    val message = MimeMessage(session)

                    // Set From: header field of the header.
                    message.setFrom(InternetAddress(‘from@example.com’))
                    toRecipients?.forEach { email ->
                        message.addRecipients(
                            Message.RecipientType.TO,
                            InternetAddress.parse(email.trim())
                        )
                    }

                    // Set Subject: header field
                    message.subject = subject

                    // Send message
                    Transport.send(message)
Step 3 – Implement the asynchronous email sending
As I mentioned earlier, you should avoid network operations on the main thread and use AsyncTask or a similar action. Here’s the example for the AsyncTask.
new AsyncTask<Void, Void, Void>() {
    @Override
    protected Void doInBackground(Void... voids) {
        new MailtrapEmailSender().sendEmail("your_mailtrap_username", "your_mailtrap_password", "to@example.com", "Subject", "Email Body");
        return null;
    }
}.execute();
Step 4 – Error handling and security
When creating the email sender class, you can use a catch block for scenarios like no internet connection, incorrect credentials, etc.
If a MessagingException is caught, the code inside the catch block executes. It throws a new RuntimeException, effectively converting a checked exception (MessagingException) into an unchecked one (RuntimeException).
Optionally, you can make the handling more granular to improve debugging and user experience. Here’s an example:
catch (MessagingException e) {
    // Log the exception for debugging purposes
    Log.e("MailtrapEmailSender", "Email sending failed", e);

    // More user-friendly error handling
    // For example, you might notify the user through a UI element
    // or send error details to a remote server for analysis
}
As for security, the Authenticator class is used to obtain the credentials.
When the session needs to authenticate to the SMTP server (as specified by mail.smtp.auth property being true), it calls this getPasswordAuthentication() method to obtain the credentials.
It’s a safer way to handle credentials that way, as it allows for dynamic retrieval of credentials.
Now, this particular implementation doesn’t retrieve credentials from a secure server, but it can be modified to do it.
You only need to replace the return statement inside the getPasswordAuthentication() command with the code to securely fetch credentials from a server or other secure storage.
For example, I’ll assume you have a secure server endpoint that provides email credentials in response to an authentication request. The modified code is as follows.
import javax.mail.Authenticator;
import javax.mail.PasswordAuthentication;
import java.net.HttpURLConnection;
import java.net.URL;
import java.util.Scanner;

public class SecureMailAuthenticator extends Authenticator {

    private String credentialEndpoint;

    public SecureMailAuthenticator(String credentialEndpoint) {
        this.credentialEndpoint = credentialEndpoint;
    }

    @Override
    protected PasswordAuthentication getPasswordAuthentication() {
        try {
            URL url = new URL(credentialEndpoint);
            HttpURLConnection connection = (HttpURLConnection) url.openConnection();
            connection.setRequestMethod("GET");
            // Add any necessary headers or authentication details to the request

            Scanner scanner = new Scanner(connection.getInputStream());
            if (scanner.hasNext()) {
                String credentials = scanner.nextLine();
                // Assuming credentials are returned in format "username:password"
                String[] parts = credentials.split(":");
                return new PasswordAuthentication(parts[0], parts[1]);
            }
        } catch (Exception e) {
            // Handle exceptions (e.g., network errors, parsing errors)
        }
        return null;
    }
}
In this code:
SecureMailAuthenticator class is a custom Authenticator class that extends javax.mail.Authenticator.
The constructor takes a URL (credentialEndpoint) pointing to the server endpoint that provides the credentials.
getPasswordAuthentication override does several things consecutively:
Opens a connection to the specified URL.
Sends a GET request (you might need to add headers or other authentication mechanisms depending on your server setup).
Reads the response (assumed to be in the format “username:password”).
Splits the response to extract the username and password.
Returns a new
PasswordAuthenticationobject with the obtained credentials.
Lastly, if you choose this method, make sure the server endpoint is indeed secure and uses HTTPS. Also, don’t forget to implement proper authentication and authorization on the server itself to safeguard the credentials.
How to send an HTML email with attachments to multiple recipients
I’ll be tweaking the code to send emails with attachments to multiple recipients via an external SMTP. There’ll be a few changes to the code and I’ll provide explanations right under the example.
import java.util.Properties;
import javax.mail.*;
import javax.mail.internet.*;

public class MailtrapEmailSender {

    public static void main(String[] args) {
        // Mailtrap SMTP configuration
        String host = "live.smtp.mailtrap.io";
        String port = "587";
        String username = "your_mailtrap_username";
        String password = "your_mailtrap_password";

        // Email properties
        Properties prop = new Properties();
        prop.put("mail.smtp.auth", "true");
        prop.put("mail.smtp.starttls.enable", "true");
        prop.put("mail.smtp.host", host);
        prop.put("mail.smtp.port", port);
        prop.put("mail.smtp.ssl.trust", host);

        // Authenticating with Mailtrap
        Session session = Session.getInstance(prop, new Authenticator() {
            protected PasswordAuthentication getPasswordAuthentication() {
                return new PasswordAuthentication(username, password);
            }
        });

        try {
            // Compose the message
            MimeMessage message = new MimeMessage(session);
            message.setFrom(new InternetAddress("from@example.com"));
            message.setRecipients(Message.RecipientType.TO,
                    InternetAddress.parse("recipient1@example.com,recipient2@example.com")); // Multiple recipients
            message.setSubject("Test Email with HTML and Attachments");

            // Create multipart object for email content
            Multipart emailContent = new MimeMultipart();

            // HTML Text
            MimeBodyPart htmlPart = new MimeBodyPart();
            htmlPart.setContent("<h1>This is an HTML Email!</h1>", "text/html");
            emailContent.addBodyPart(htmlPart);

            // Attachment
            MimeBodyPart attachmentPart = new MimeBodyPart();
            attachmentPart.attachFile("/path/to/file"); // Specify the file path
            emailContent.addBodyPart(attachmentPart);

            // Set content
            message.setContent(emailContent);

            // Send the email
            Transport.send(message);

            System.out.println("Email sent successfully");

        } catch (MessagingException | IOException e) {
            e.printStackTrace();
        }
    }
}
In this code:
Again, I created a
Sessionobject using Mailtrap SMTP settings.To compose the email, I created a
MimeMessageobject and set the sender, recipients (multiple), email subject, and body (HTML content).I used
MimeMultipartto structure the email with different parts, such as the main body and the attachments.The HTML content is added as one part of the email. If necessary, you can also send text/plain email.
For attachments, I created a new part for each file and added it to the email. Yes, the example can handle multiple attachments.
Lastly, the error handling and security are basic here since we already covered a few different options in the previous section. But if you’re curious about increased security for the attachments, check the “Send with attachments” section under email API.
Send email in Android with JavaMail and email API
Using an email API provides a direct way to send emails from your Android app without needing an SMTP server setup. As always, you need to ensure to handle the API token securely and manage network responses and errors effectively.
I’ll be using Mailtrap Email API and it’s necessary to add additional dependencies so you can make an HTTP request.
Remember: You need to verify and authenticate your sending domain with Mailtrap to send via API or SMTP.
Step 1 – Adding dependencies and the internet permission
I’ll add the OkHttp dependency to the build.gradle file.
implementation 'com.squareup.okhttp3:okhttp:4.9.1'
Internet permission in the AndroidManifest.xml.
<uses-permission android:name="android.permission.INTERNET"/>
Step 2 – Get Mailtrap API token
You can get your Mailtrap API token under Settings, the API Tokens menu.

Make sure you have Domain or Account Admin permission for the domain you’ll use to send emails. If not, contact your Account Admin or Owner to grant you the permission.
Then, you can click the More menu (three vertical dots) and hit Copy token to copy it to your clipboard.
Step 3 – Create an email sender class
Like with SMTP, I’ll create an email sender class, only this time it’s designed for API calls.
import okhttp3.MediaType;
import okhttp3.OkHttpClient;
import okhttp3.Request;
import okhttp3.RequestBody;
import okhttp3.Response;
import java.io.IOException;

public class MailtrapApiEmailSender {

    private final String mailtrapApiToken;
    private final OkHttpClient client = new OkHttpClient();

    public MailtrapApiEmailSender(String mailtrapApiToken) {
        this.mailtrapApiToken = mailtrapApiToken;
    }

    public void sendEmail(String recipient, String subject, String body) throws IOException {
       OkHttpClient client = new OkHttpClient();
                    String json = "{\n" +
                            "  \"to\": [\n" +
                            "    {\n" +
                            "      \"email\": \"" + recipient + "\",\n" +
                            "      \"name\": \"Recipient Name\"\n" +
                            "    }\n" +
                            "  ],\n" +
                            "  \"from\": {\n" +
                            "    \"email\": \"anyname@freelance.mailtrap.link\",\n" +
                            "    \"name\": \"Sender Name\"\n" +
                            "  },\n" +
                            "  \"subject\": \"" + subject + "\",\n" +
                            "  \"text\": \"" + body + "\"\n" +
                            "}";
                    MediaType mediaType = MediaType.parse("application/json");
                    RequestBody requestBody = RequestBody.create(json, mediaType);
                    Request request = new Request.Builder()
                            .url("https://send.api.mailtrap.io/api/send")
                            .addHeader("Content-Type", "application/json")
                            .addHeader("Accept", "application/json")
                            .addHeader("Api-Token", token)
                            .post(requestBody)
                            .build();

                    client.newCall(request).enqueue(new Callback() {
                        @Override
                        public void onResponse(@NonNull okhttp3.Call call, @NonNull Response response) {
                            sbSendEmail.dismiss();
                            if (response.isSuccessful()) {
                                Snackbar.make(binding.getRoot(), "Email Sent!", Snackbar.LENGTH_LONG).show();
                            } else {
                                Snackbar.make(binding.getRoot(), "Something Went Wrong!", Snackbar.LENGTH_LONG).show();
                            }
                        }

                        @Override
                        public void onFailure(@NonNull okhttp3.Call call, @NonNull IOException e) {
                            e.printStackTrace();
                            Snackbar.make(binding.getRoot(), "Something Went Wrong!", Snackbar.LENGTH_LONG).show();
                        }
                    });
    }
}
Step 4 – Implement asynchronous email sending
Again, you want to avoid operations on the main thread, and I’ll be using the AsyncTask.
new AsyncTask<Void, Void, Void>() {
    @Override
    protected Void doInBackground(Void... voids) {
        try {
            new MailtrapApiEmailSender("your_mailtrap_api_token").sendEmail("to@example.com", "Subject", "Email Body");
        } catch (IOException e) {
            e.printStackTrace(); // Handle exceptions appropriately
        }
        return null;
    }
}.execute();
Step 5 – Error handling and security
In the example above, the error handling is managed through the try-catch block. The current implementation throws a generic IOException for any unsuccessful response.
A more robust approach would be to analyze the response further and throw different exceptions based on the exact issue (e.g., authentication failure, rate limiting, invalid request format). Here’s an example of the extended error handling:
       try (Response response = client.newCall(request).execute()) {
            if (!response.isSuccessful()) {
                handleErrorResponse(response);
            }
            // Handle successful response or return it
        }
    }

    private void handleErrorResponse(Response response) throws EmailSendingException, IOException {
        switch (response.code()) {
            case 401:
                throw new EmailSendingException("Authentication failed.");
            case 429:
                throw new EmailSendingException("Rate limit exceeded.");
            case 400:
                throw new EmailSendingException("Invalid request format.");
            default:
                throw new IOException("Unexpected code " + response);
        }
    }

    // Custom exception for email sending errors
    public static class EmailSendingException extends Exception {
        public EmailSendingException(String message) {
            super(message);
        }
    }
}
As always, you should avoid exposing your API token in the code.
In the example under Step 3, the API token is passed to the MailtrapApiEmailSender constructor, meaning it’s not hardcoded within the class. This is a good practice as it allows the token to be stored and retrieved securely from outside the class, such as from encrypted storage or a secure server.
The code uses HTTPS (https://send.api.mailtrap.io/api/send) for sending requests, which is critical for ensuring the data transmitted is encrypted and secure from eavesdropping or man-in-the-middle attacks.
Yeah, there’s still room for improvement. I won’t go into code examples here, but just list the points you may consider implementing, particularly if you wish to send at a volume.
Token exposure: Although the token isn’t hardcoded, it’s still passed around, which could expose it to risks if not handled carefully. Ideally, the token should be accessed in a way that minimizes its exposure in memory and logs.
Error logging: While not directly a security issue, careful error logging (without exposing sensitive information like tokens) can help identify and address security-related issues more quickly.
Input validation: Before creating the JSON request, validating inputs like recipient, subject, and body can prevent injection attacks or unintended errors.
Want to learn more about security measures and how to test emails before sending? Check the article which is published on mailtrap.io